Thursday, December 16, 2010

Ligatures!

Click to enlarge

Ligatures!


  • These are 4 ligatures I created.
  • For two of the ligatures the "The Pancake House" and "New Years Eve" I just attached the ends of the letters to one another so all of the words flowed together.
  • The "NYC" ligature I connected at an angle.
  • The "Hello Goodbye' ligature also has attached letters. The two "L"s are flipped around so their backs are facing eachother, same goes for the "B" and the "D" in goodbye.
  • This project was okay, I didn't really have any ideas to make these ligatures more creative besides attaching all of the letters together. 
  • It was also hard to connect words with two or three lines. 

Tuesday, December 14, 2010

Shape Replacement Letters


  • For this project I took a word and replaced one letter in the word with a picture that had the similar shape as the letter. So, the candy cane is an "i", the cookie is an "o", the reese's peanut butter cup is the apostrophe in reese's and the purple daisy is the "o" in flower. I would find the picture on safari and save it to my desktop. I then went to FILE and PLACE and selected the picture on the desktop. I then created an outline for the picture and went to LIVE TRACE and TRACING OBJECTS. Depending on which one looked best I either chose color 6 or color 16 for the picture. 
  • I thought this was an easy yet fun project. I like the way my final letters came out. I think all the pictures successfully represent the replaced letters. I would give myself a 9/10 for this project and I would enjoy to do it again. 

Day 8 Tutorial

Day 8 Tutorial - Click to enlarge

Day 9 Tutorial - Click to enlarge

Day 10 Tutorial - Click to enlarge

Day 12 Tutorial - Click to enlarge

Adobe Illustrator Tutorial

  • On Adobe Illustrator, I did a day 8- 12 tutorial that taught me how to use different the different tools of illustrator. 
  • I learned how to use all of the tools within the pathfinder drop down menu such as add from shape area, subtract from shape area, divide etc.
  • The tutorial showed how the gradient button is used and how many colors can be put into the gradient bar and either linear or radial gradient can be done.
  • Overall this tutorial was helpful and will come in handy with my future Adobe Illustrator projects.

Monday, December 13, 2010

Expressive Typography Project

Click to enlarge image
Skills Learned:

  • Stacked Text
  • Figure Ground Reversal
Reflection:

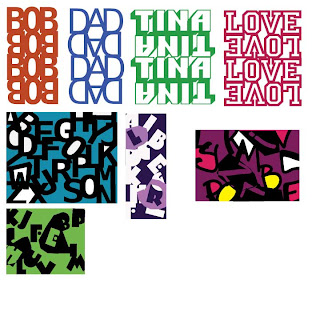
I did this project in Adobe Illustrator. I started off with the stacked text words. I chose a three to four letter word and typed it in and clicked on create outline. I then copy and pasted it and rotated it 180 degrees and matched the two bottoms up. I highlighted the upside down and right side up words and pressed add to shape area on the pathfinder tab. This gave me stacked text. This was a simple project i thought. I would give myself a 9/10 because all of the word match up and are aligned, I added color to the words and utilized different fonts for each text.

The figure ground reversal project I also did in Adobe Illustrator. This one was more challenging, especially when I tried to add the pen tool in the back ground. My inspiration for my figure ground reversal projects was an article Mr. Boothby placed on my computer desktop which had different styles and types of reversal ideas. My favorite reversal above is the one all the way on the right because it has many different colors, I added the pen tool in the background and overall I think it is ascetically pleasing. I would give myself a 8/10 on this project because there is always room for improvement and I think I need to get better at using the pen tool in the background.    

Thursday, November 11, 2010

ADOBE SPACE SHIP

Click to enlarge
This is my space ship I made using the Space Ship tutorial in Adobe Illustrator. The project was fun however challenging. The tutorial was at times confusing but overall I figured it out and was able to make the space ship in the style it told me to. I learned a lot more about Adobe Illustrator with this project than the last one because this one was more in depth and I had to use more complex and difficult tools. Some of the tools I used were:
-The shape tool which helped me make t l body of the space ship, the moon, the stars, and the exhaust pipe of the space ship.
-The subtract from shape tool I also used a lot which helped me create the flames, and the two fins. I also used this tool to create the shadow which is above the window of the space ship and it is also below the fin on the body of the space ship.
-The gradient tool helped me design the body of my space ship. It allowed the color to go from a deep red to a bright red.

Overall, I liked this project better than the shapes project because once I was done with creating the space ship I was allowed to personalize it a bit, such as adding the stars and the moon to make it look as if it is actually flying through space. Things I would do better would be the flames, they seem squared off, I wish they were rounded off a little more. I would also have added a gradient to the dark blue background going from light blue to dark blue instead of just having one giant dark blue square. Things I like about this project is overall I think its an ascetically pleasing project and I would do it again. I completed the project by its due date and I followed all the instructions listed on the tutorial so, for a participation grade I would give myself 9/10. My spaceship and overall project i'm sure could be improved however, I don't think it is that bad looking so for an overall grade i would say 9/10.

Monday, November 1, 2010

Adobe Illustrator Practice

Click to enlarge


Project Description: Once done with the photoshop project it was time to move on to adobe illustrator. On Mr. Boothby's Blog there is a link to a tutorial that teaches you how to use the pen tool, and pencil tool to draw basic shapes. I practiced certain shapes on illustrator and then i began drawing specific shapes required for this project.

New Skills:
- Pencil tool
     - Shape tool: drawing stars, squares, 20 point stars
- Pen tool
     - Using anchors to draw shapes
  
Overall view of project: These are my Adobe Illustrator practice shapes. There is a square, rectangle, circle, oval, pentagon, triangle, 20 point star, key, heart, speech bubble, my left and right hand, a leaf, a dog bone, a bunny rabbit, a shamrock, two matching puzzle pieces, and a clover. Some of these shapes are made with the pencil tool and other shapes are made with the pen tool. While doing this, I found out that the pencil tool was so much easier to use and create things compared to the pen tool. I used the pencil tool to draw shapes such as my hands and I just simply had to put my hand to the screen and trace which was relatively simple. However, when it came time for the pen tool I ran into difficulty. I found it difficult to use and connect anchors to create shapes such as the bunny rabbit. I will need more practice with the pen tool in the future. I would give myself a 9/10 for participation points because I completed the project in time and followed all of the directions. For an overall grade I would say 7/10 because my shapes drawn with the pen are not that great because I found this tool particularly difficult.  

Monday, October 18, 2010

kmargaret's KO Project

So, these are my finished KO designs. The "daisy" one was easiest because it was only one picture within the word. The process of adding more pictures within a word was harder but i figured it out. My name took me the longest because i had to find pictures that would fit within my letters and would blend well with other pictures. This was my first time using photoshop so i had some troubles but overall the project went well and i liked it. 

Thursday, September 23, 2010

9/23/10

**Ate lunch today with the volleyball girls to get pumped for the game against Morris Knolls.

** Had a fire drill, its really nice out which i don't like because i want winter to come so it can snow.

** Have a big physics exam tomorrow that I gotta study a lot for tonight.

** Gonna use my privilege pass tomorrow and go get lunch with John <3 instead of eating in the cafeteria.

** Tomorrow's TGIF!!!  

Tuesday, September 21, 2010

To Jenn-ay...


Happy birthday to you, 
happy birthday to you, 
happy birthday dear Jenny, 
happy birthday to you! 


Love, Kristina

Monday, September 20, 2010

New Blog

Hey,

I just set up my first blog for my graphics class at school. I've never done this before so, this is all new to me. Tomorrow is JCD's birthday and i'm gonna make her brownies for after our game against Pope John!