Thursday, December 16, 2010

Ligatures!

Click to enlarge

Ligatures!


  • These are 4 ligatures I created.
  • For two of the ligatures the "The Pancake House" and "New Years Eve" I just attached the ends of the letters to one another so all of the words flowed together.
  • The "NYC" ligature I connected at an angle.
  • The "Hello Goodbye' ligature also has attached letters. The two "L"s are flipped around so their backs are facing eachother, same goes for the "B" and the "D" in goodbye.
  • This project was okay, I didn't really have any ideas to make these ligatures more creative besides attaching all of the letters together. 
  • It was also hard to connect words with two or three lines. 

Tuesday, December 14, 2010

Shape Replacement Letters


  • For this project I took a word and replaced one letter in the word with a picture that had the similar shape as the letter. So, the candy cane is an "i", the cookie is an "o", the reese's peanut butter cup is the apostrophe in reese's and the purple daisy is the "o" in flower. I would find the picture on safari and save it to my desktop. I then went to FILE and PLACE and selected the picture on the desktop. I then created an outline for the picture and went to LIVE TRACE and TRACING OBJECTS. Depending on which one looked best I either chose color 6 or color 16 for the picture. 
  • I thought this was an easy yet fun project. I like the way my final letters came out. I think all the pictures successfully represent the replaced letters. I would give myself a 9/10 for this project and I would enjoy to do it again. 

Day 8 Tutorial

Day 8 Tutorial - Click to enlarge

Day 9 Tutorial - Click to enlarge

Day 10 Tutorial - Click to enlarge

Day 12 Tutorial - Click to enlarge

Adobe Illustrator Tutorial

  • On Adobe Illustrator, I did a day 8- 12 tutorial that taught me how to use different the different tools of illustrator. 
  • I learned how to use all of the tools within the pathfinder drop down menu such as add from shape area, subtract from shape area, divide etc.
  • The tutorial showed how the gradient button is used and how many colors can be put into the gradient bar and either linear or radial gradient can be done.
  • Overall this tutorial was helpful and will come in handy with my future Adobe Illustrator projects.

Monday, December 13, 2010

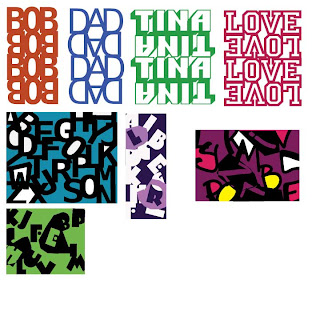
Expressive Typography Project

Click to enlarge image
Skills Learned:

  • Stacked Text
  • Figure Ground Reversal
Reflection:

I did this project in Adobe Illustrator. I started off with the stacked text words. I chose a three to four letter word and typed it in and clicked on create outline. I then copy and pasted it and rotated it 180 degrees and matched the two bottoms up. I highlighted the upside down and right side up words and pressed add to shape area on the pathfinder tab. This gave me stacked text. This was a simple project i thought. I would give myself a 9/10 because all of the word match up and are aligned, I added color to the words and utilized different fonts for each text.

The figure ground reversal project I also did in Adobe Illustrator. This one was more challenging, especially when I tried to add the pen tool in the back ground. My inspiration for my figure ground reversal projects was an article Mr. Boothby placed on my computer desktop which had different styles and types of reversal ideas. My favorite reversal above is the one all the way on the right because it has many different colors, I added the pen tool in the background and overall I think it is ascetically pleasing. I would give myself a 8/10 on this project because there is always room for improvement and I think I need to get better at using the pen tool in the background.